
SwarmUI Integration

SwarmUI is a media studio application for image, video, and other multimedia generation. It primarily acts as a beginner-friendly wrapper for ComfyUI.
ComfyUI performs most of the actual work for SwarmUI and is a complex node-based workflow editor for the aforementioned multimedia and corresponding generative AI models.
We do recommend beginning with SwarmUI for two reasons:
- SwarmUI can automatically identify and download ancillary models that are required by models you choose to import.
- Musebot is developed against SwarmUI and example workflows provided with Musebot are made with custom ComfyUI nodes bundled with SwarmUI.
As usual, we recommend you refer to the SwarmUI documentation for configuring and installing SwarmUI.
1. Install Custom Nodes
Once you have SwarmUI installed and running, we recommend installing some custom nodes that are either useful or required for Musebot to function.
Alternatively, you can use the official Musebot backend container to get started instead of doing this manually. This is available from the Musebot release channel in Discord.
If you chose to install SwarmUI manually, follow the steps below.
Inside the SwarmUI directory (usually installed as SwarmUI/), you'll find the ComfyUI installation in swarmui/dlbackend/ComfyUI/. We're interested in the custom_nodes directory within. Go ahead and navigate to that directory in your preferred shell.
Activate ComfyUI's virtual Python environment from within the root ComfyUI directory:
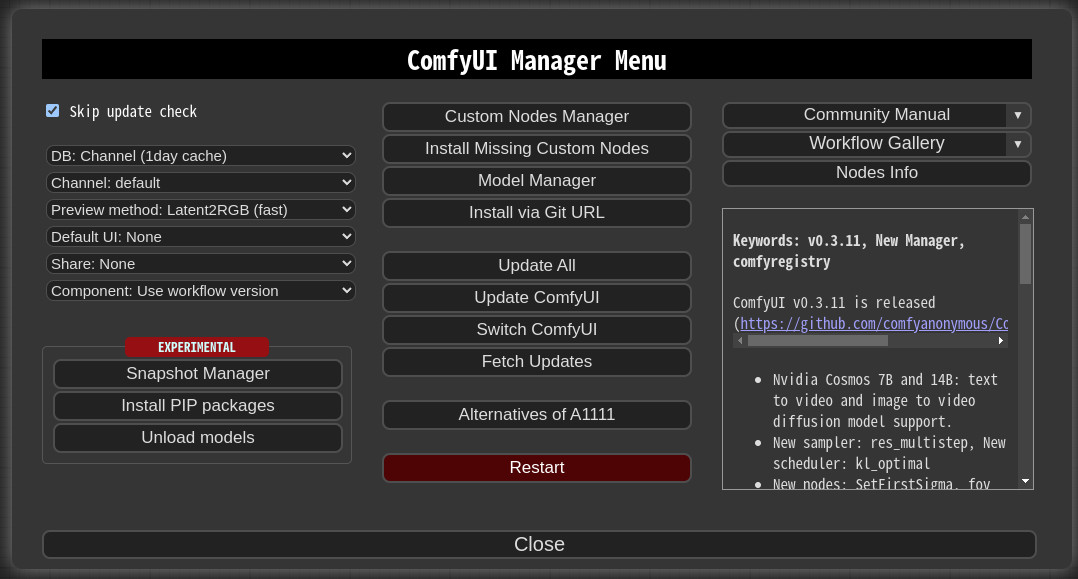
. venv/bin/activateInstall ComfyUI-Manager. This does require that you have both
gitandpython(version 3) installed.git clone https://github.com/ltdrdata/ComfyUI-Manager comfyui-manager cd comfyui-manager/ pip install -r requirements.txt cd ..Restart SwarmUI and/or ComfyUI if you want to use the manager. The ComfyUI backend can be restarted independently of SwarmUI from within the SwarmUI interface. Once ComfyUI-Manager is installed, many of the following custom nodes can be installed from within it through the "Custom Nodes Manager", or you can continue with the following provided CLI instructions.
Install ComfyUI-KJNodes:
 git clone https://github.com/kijai/ComfyUI-KJNodes.git
 cd ComfyUI-KJNodes/
 pip install -r requirements.txt
 cd ..
Install comfyui-tooling-nodes.
 git clone https://github.com/Acly/comfyui-tooling-nodes.git
 cd comfyui-tooling-nodes/
 pip install -r requirements.txt
 cd ..
Restart SwarmUI and/or ComfyUI. Once again, the ComfyUI backend can be restarted from within SwarmUI. (
Servertab »Backendstab »Restart All Backendsbutton)
2. Enable Dev Mode
Navigate to the SwarmUI URL in your preferred web browser. If this is localhost for you, this is most likely available on the default port: http://localhost:7801
Locate the
Comfy Workflowtab in SwarmUI and navigate using it:
Look for the large gear icon in the bottom left of ComfyUI.

Enable
Dev Modein the settings modal: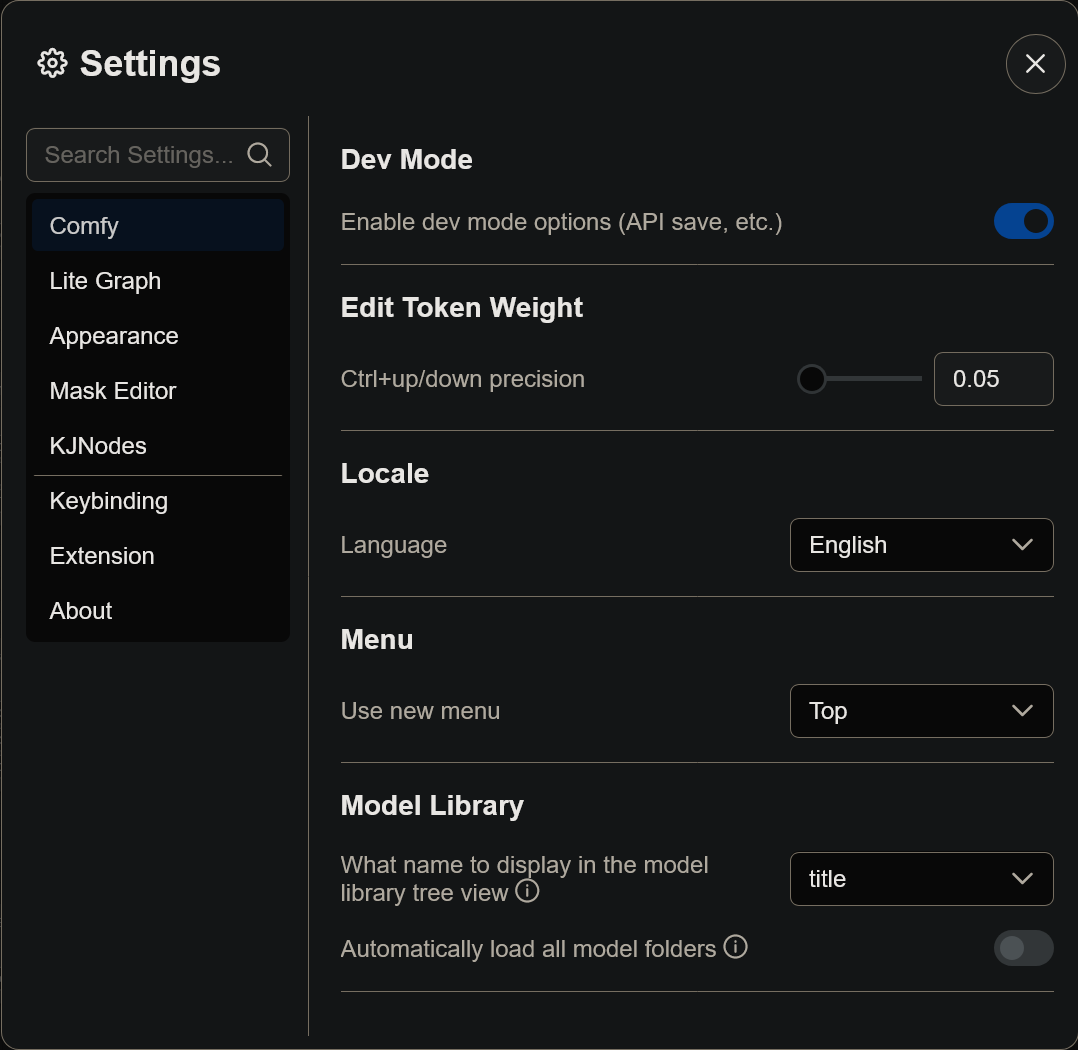
3. Connect SwarmUI to Musebot
In your .env configuration file, make sure to set MUSEBOT_STABLE_DIFFUSION_API_TYPE to ComfyUI. This is the correct value, even for SwarmUI.
Also in your .env configuration file, set MUSEBOT_STABLE_DIFFUSION_HOSTS to your ComfyUI backend included as part of Swarm UI. If your SwarmUI instance is running on localhost, this setting will generally look like:
...

MUSEBOT_STABLE_DIFFUSION_HOSTS=http://localhost:7801/ComfyBackendDirect

...
Make sure to substitute your machine's hostname or IP address instead and that it's accessible from your Musebot instance(s).
4. Finding Image Generation Models
Most image generation models can be found on:
Note: CivitAI contains mature or sensitive material, so browse responsibly.
Image generation models are typically distributed as either of the following file formats. Don't worry too much about the difference, but they do require begin copied to different directories within SwarmUI/.
*.safetensors: Typically installed inSwarmUI/Models/Stable-Diffusion/*.gguf: Typically installed inSwarmUI/Models/diffusion_models/
SwarmUI is very helpful and will automatically recommend download and installation of most ancillary models and/or workflow nodes.
Note: If you want to organize your models in subdirectories within their respective destinations, SwarmUI supports that. Make sure the full model path is specified in your workflow templates, however.
5. Musebot Workflow Templates
ComfyUI uses processing pipelines known as workflows. They contain a list of instructions used to generate the output media (usually, but not limited to, an image) at the end of the pipeline.
Confusingly, ComfyUI supports two different types of workflows, and both can be exported. This is why we needed to enable Dev Mode in ComfyUI.
Musebot utilizes API workflows with a few modifications after export. This is what the ./workflows directory/mount point (depending on your Musebot configuration) is included for with Musebot.
Exporting a ComfyUI API Workflow
Navigate to the
Comfy Workflowtab in SwarmUI:Load or create a workflow in ComfyUI. If you've successfully generated an image or other piece of media using the
Generatetab, SwarmUI contains an extremely usefulImport From Generate Tabbutton that will automatically build a ComfyUI workflow for you based on your last render:
Find the
Workflowmenu in the Comfy UI user interface:
Select the
Export (API)menu item: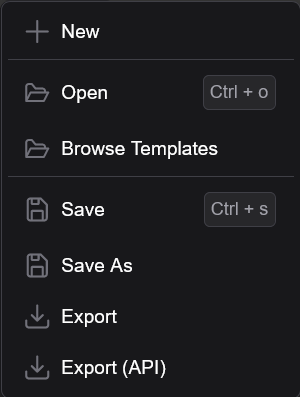
You will then name the workflow and will be asked to save it. Navigate to Musebot's workflow directory and save your workflow in the correct directory based on what type of workflow you've built.
Fill in any applicable defaults for in the workflow templates. More on this is documented in the "Musebot Defaults" section of this documentation.
Musebot is also distributed with some example workflows to help get you started.
Note: You may need to design your workflows around Musebot's limitations.
Types of Workflows
Musebot supports a limited number of specific workflow types and each are mapped to matching directories within ./workflows:
img2img: These workflows accept a base64 encoded image and process the image into another image. Eachimg2imgworkflow will create a custom button in Musebot's interface. Workflows can be named any valid file name, but if you want them in a specific order, consider prefixing them with numbers.Animated images are supported in
img2imgworkflows. Animated images should be exported as animated WebP images or GIF images, though beware of Discord's upload size limits. WebP is probably the more size-conscious choice.img2vid: These workflows accept a base64 encoded image and process the image into a video. Eachimg2vidworkflow will create a custom button in Musebot's interface. The img2vid output must either be an animated.gifor.webp. Workflows can be named any valid file name, but if you want them in a specific order, consider prefixing them with numbers.txt2audio(Experimental):txt2img: These workflows accept a text prompt and return one or several images. If you provide multiple workflows in this directory, Musebot will choose a random one.Animated images are supported in
txt2imgworkflows. Animated images should be exported as animated WebP images or GIF images, though beware of Discord's upload size limits. WebP is probably the more size-conscious choice.txt2music: These workflows accept two prompts:- Music tags/style/genre/instruments/mood (
{{{ prompt }}}) - Lyrics (
{{{ prompt2 }}})
ACE-Step is the recommended model for this workflow.
- Music tags/style/genre/instruments/mood (
txt2vid(Experimental): These workflows accept a text prompt and return a video. Be aware of your Discord account's/instance's upload limits. If you provide multiple workflows in this directory, Musebot will choose a random one.
Note: Musebot reloads all workflows before each task, so you don't need to restart Musebot when modifying workflows.
Musebot Defaults
In order for Musebot to control various aspects of each workflow, it makes use of the Mustache template language. Don't worry! Musebot's implementation is very basic, and you shouldn't need to reference the Mustache documentation very much, if at all.
Understand the API workflows exported by ComfyUI are JSON files. JSON is a plaintext format used to exchange data in a standard way between various systems and represent a hierarchy of concepts called an object, but you won't really need to worry about that too much.
Once you open the workflow in your favorite text editor, you'll probably understand some of the concepts and syntax intuitively if you're not already familiar.
Note: Ensure that you open the workflow in a text editor. Word processors such as Microsoft Word are not sufficient to edit these files.
Each workflow file should begin with a curly brace:
{. This represents the beginning of a JSON object. We need to define two different things in each workflow file to turn them into templates:- A new child object within the workflow object that defines defaults for Musebot to read for each workflow
- Mustache template placeholders so Musebot can insert those values in the appropriate place in each workflow
This is easy once understood, but can be daunting your first time. Please refer to the example workflows provided as they illustrate these concepts concretely. Feel free to even use the provided templates as-is provided you use the same models and place your models in the correct filesystem location as dictated by the templates - or edit the model file paths in the workflow to match models you have already downloaded and placed in the appropriate location for SwarmUI. Please refer to the SwarmUI documentation for model installation.
Defaults Object
The Musebot defaults object should be placed within the root (top) level pair of curly braces, preferably at the top of the file. (Though technically this doesn't matter.)
This should look something like:
{
   // txt2* workflows only below here.
  "$musebotDefaults": {
   "prompt": "",
   "prompt2": "",
   "promptNegative": "",
   "workflow": "",
   "seed": -1,
   "width": 1024,
   "height": 1024,
   "sampler": "dpmpp_sde",
   "scheduler": "karras",
   "cfgScale": 2,
   "steps": 8,
   "num": 1,
   // img2img workflows only below here.
   "label": "",
   "title": "",
   "helpText": "",
   "image": "",
   "maxWidth": 1024,
   "maxHeight": 1024,
   // txt2audio, txt2music, txt2vid, img2img (animated), and img2vid only below
   // here. The units can vary, referring to frames, seconds, etc. Refer to your
   // model documentation to determine the type of value.
   "duration": 30,
   // Do not set duration (above) if you want to provide a random range.
   "durationMin": 90,
   "durationMax": 240,
   // Extra ACE-Step v1.5 properties begin here. Only use these if using
   // txt2music workflows with ACE-Step v1.5. Ollama integration with a model
   // supporting structured requests is required to automatically fill in the
   // below values. Otherwise they have to be hardcoded.
   "bpm": 140,
   "keyScale": "Bb major",
   "timeSignature": 4
  },
  // The exported  ComfyUI (API) workflow nodes should begin here.
}
prompt: The text prompt given to the model that instructs it what to create.prompt2: A secondary prompt placeholder used for models that support it. Optional.promptNegative: The negative prompt used to "remove" things from the model output. Optional.workflow: The workflow being used, those this is only used during JSON prompts delivered via Discord. This can be set to an empty string in templates.seed: A number used for randomization in the model --1can be used as a placeholder, but this is always overridden by Musebot at this time.width: The resolution of any graphical output - this is usually dependent on the model being used.height: The resolution of any graphical output - this is usually dependent on the model being used.sampler: The sampler algorithm that should be used - feel free to experiment with available samplers in ComfyUI for best results. Some models may recommend particular samplers.scheduler: The scheduler algorithm that should be used - feel free to experiment with available schedulers in ComfyUI for best results. Some models may recommend particular schedulers.cfgScale: This is generally how strictly the selected model follows the text prompt. Some models may recommend a specific CFG scale.steps: This is how many iterations the models should sample its output. Some models may recommend a particular number of steps.num: This is how many images or videos to output at a time. Consider your hardware's average processing time before doing more than one output at a time.duration: The length of time used for certain outputs types. This usually applies to animations, audio, music, or video. Unit can vary based on model, so refer to your model documentation to understand the units this duration applies to. If you wish to set a random duration for your workflow, do not define or set this value.durationMin: The minimum duration to select a random duration from. Do not use in conjunction withduration.durationMax: The maximum duration to select a random duration from. Do not use in conjunction withduration.label(img2img and img2vid workflows only): This is used for the displayed text on your custom Musebot button.title(img2img and img2vid workflows only): This is used for the title (context tooltip) text for the button and the button title in the generated help article. Optional, but the help article will call it out if it's missing.helpText(img2img and img2vid workflows only): This is used as the descriptive help text in the generated help article. Optional, but the help article will call it out if it's missing.image(img2img and img2vid workflows only): A base64 encoded image used inimg2imgandimg2vidworkflows.maxWidth(img2img and img2vid workflows only): Some workflows based on existing imagery may have resolution limits, particularly in the case of video models that output to specific resolutions. This places an upper limit on the width of the image input. BothmaxWidthandmaxHeightmust be specified before this feature will work. Image aspect ratio will always be preserved.maxHeight(img2img and img2vid workflows only) Some workflows based on existing imagery may have resolution limits, particularly in the case of video models that output to specific resolutions. This places an upper limit on the height of the image input. BothmaxWidthandmaxHeightmust be specified before this feature will work. Image aspect ratio will always be preserved.
Template Placeholders
Each default property documented above can be referenced in the workflow template. Each property should be wrapped in quotes and triple curly brackets, even if it's numeric. Let's look at two examples:
An Input Text Prompt Example
{
   // ...
   "6": {
    "inputs": {
      "text": "{{{ prompt }}}",
      "clip": [
        "4",
        1
      ]
    },
    "class_type": "CLIPTextEncode",
    "_meta": {
      "title": "CLIP Text Encode (Prompt)"
    }
  },
  // ...
}
Sampler Settings Example
{
   // ...
   "10": {
    "inputs": {
      "noise_seed": "{{{ seed }}}",
      "steps": "{{{ steps }}}",
      "cfg": "{{{ cfgScale }}}",
      "sampler_name": "{{{ sampler }}}",
      "scheduler": "{{{ scheduler }}}",
      "start_at_step": 0,
      "end_at_step": 10000,
      "var_seed": 0,
      "var_seed_strength": 0,
      "sigma_max": -1,
      "sigma_min": -1,
      "rho": 7,
      "add_noise": "enable",
      "return_with_leftover_noise": "disable",
      "previews": "default",
      "tile_sample": false,
      "tile_size": 1024,
      "model": [
        "4",
        0
      ],
      "positive": [
        "6",
        0
      ],
      "negative": [
        "100",
        0
      ],
      "latent_image": [
        "5",
        0
      ]
    },
    "class_type": "SwarmKSampler",
    "_meta": {
      "title": "SwarmKSampler"
    }
  },
  // ...
}
Return
Return to the main Musebot Documentation and continue from step 2 if you want to setup additional generative AI solutions or continue on to step 3.